Pin It
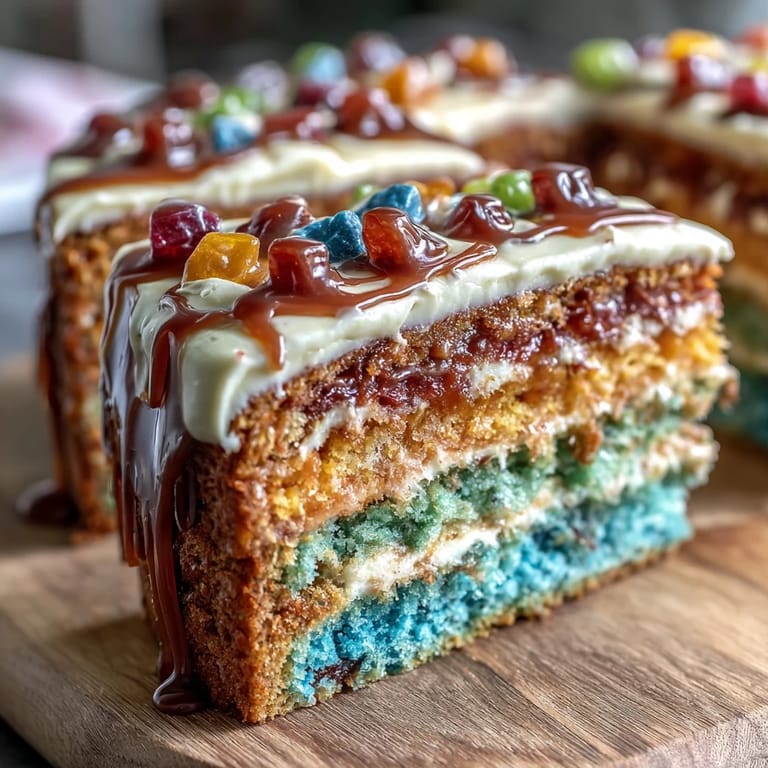
 There's something magical about the moment a knife cuts through frosting and suddenly reveals a cascade of colorful candies tumbling out—that's the magic of a piñata cake, and it never gets old. My first attempt happened when I was tasked with bringing something spectacular to a Cinco de Mayo party, and honestly, I was nervous about pulling off something this showy. But watching my friend's face light up as those rainbow layers and hidden candy surprise emerged made every colored batter bowl and careful assembly worth it.
I made this cake for my nephew's birthday party on a sweltering afternoon, and the kitchen turned into this joyful chaos of food coloring and batter bowls everywhere. He kept sneaking peaks at what I was doing, and when I finally sliced into it at the party, he jumped up and down like he'd won the lottery—all those little candies spilling out felt like pure magic to him.
Ingredients
- All-purpose flour: The foundation of a tender crumb; make sure you're measuring by weight or fluffing and leveling to avoid a dense cake.
- Baking powder and baking soda: These work together to give you that light, fluffy texture that makes each bite feel special.
- Unsalted butter and granulated sugar: Beating them together until pale and fluffy is where the magic starts—don't skip this step.
- Room temperature eggs and milk: This matters more than you'd think; cold ingredients don't blend as smoothly and can give you an uneven crumb.
- Gel food coloring: Gel is stronger than liquid coloring, so you'll get those vibrant rainbow hues without thinning out your batter.
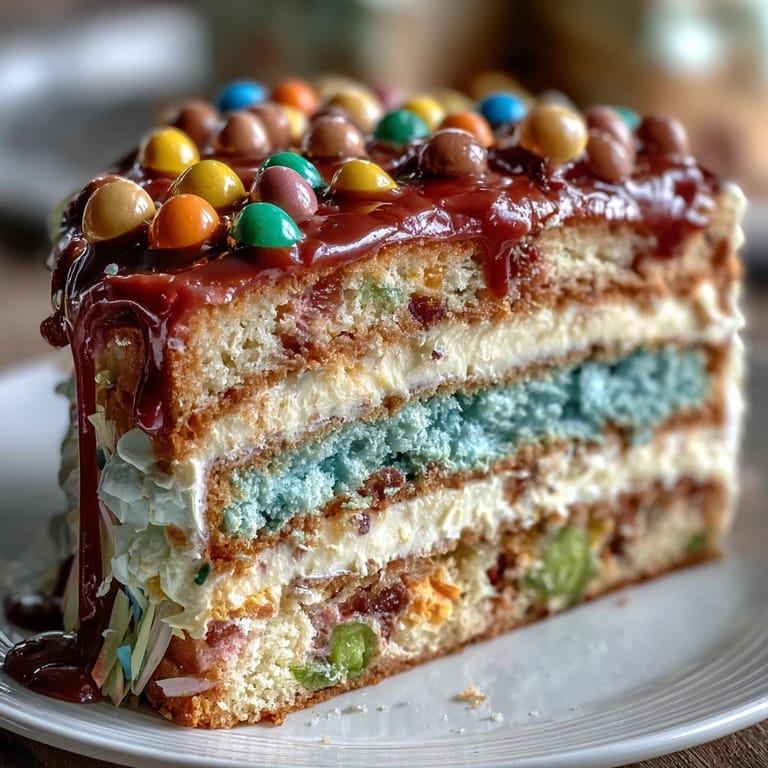
- Assorted small candies: Avoid anything sticky or super hard that could damage teeth; gummy bears, mini M&Ms, and sprinkles work beautifully.
- Butter and powdered sugar for frosting: Softened butter beats smoother and holds air better, creating that cloud-like frosting that hugs the cake perfectly.
Tired of Takeout? 🥡
Get 10 meals you can make faster than delivery arrives. Seriously.
One email. No spam. Unsubscribe anytime.
Instructions
- Get your pans ready and heat your oven:
- Preheat to 350°F and grease three 8-inch round pans, lining the bottoms with parchment so your layers release beautifully. This step takes two minutes but saves you heartbreak later.
- Mix your dry ingredients:
- Whisk together flour, baking powder, baking soda, and salt in a medium bowl—this distributes the leavening evenly so you get a consistent rise. I like to whisk by hand here because it feels meditative.
- Cream your butter and sugar:
- Beat them together until the mixture is pale, fluffy, and about double in volume—roughly three minutes with an electric mixer. This is where your cake gets its tender, airy structure.
- Add your eggs and vanilla one at a time:
- After each egg, beat well so it's fully incorporated before adding the next one. This prevents the batter from looking curdled and lumpy.
- Alternate dry and wet ingredients:
- Add flour mixture and milk in three parts, starting and ending with flour—this keeps everything from getting overworked. Stir just until combined; overmixing creates a tough cake.
- Divide and color your batter:
- Split the batter into six bowls and tint each one a different color using gel food coloring—drop by drop at first, then mix thoroughly. The colors will look a bit muted in the raw batter but bake to vibrant perfection.
- Pour and bake your layers:
- Pour each colored batter into its own prepared pan (or bake in batches if you only have three) and bake for 15-18 minutes until a toothpick comes out clean. Let them cool in the pans for 10 minutes, then turn them out onto wire racks.
- Cut out the center cavities:
- Once completely cool, use a 3-inch round cutter to carve out the center of four layers, leaving the top and bottom layers whole. This creates the hidden cavity where your candy surprise will live.
- Make your frosting:
- Beat softened butter until creamy, then gradually add powdered sugar, milk, vanilla, and salt—beat until it's smooth and pillowy. This frosting should feel light and spreadable, not dense.
- Layer and assemble:
- Start with your purple layer on the serving plate, frost lightly, then stack your cut-out layers with frosting between each one. Take your time here; the frosting acts as your cake's glue.
- Fill with the candy surprise:
- Pour your assorted candies into the center cavity, being generous—this is what makes people smile when they cut into it. Use a mix of shapes and colors for the best visual effect.
- Top it off:
- Place your final whole cake layer on top like you're closing a secret box, then frost the outside generously. Decorate with colored frosting, sprinkles, or festive touches that match your celebration.
- Chill and slice:
- Let the cake sit in the fridge for 30 minutes—this firms everything up and makes slicing clean and beautiful. A hot knife dipped in water between slices helps too.
 Pin It
 The best moment came when someone at the party sliced into their piece and their fork clinked against a candy inside—that little sound of surprise is what this cake is all about. It's not just about eating something delicious; it's about creating a moment everyone remembers.
Coloring Your Batter Like a Pro
The key to vibrant rainbow layers is trusting that gel food coloring is concentrated—you need way less than you think. Start with just a few drops, mix thoroughly, and add more if needed; it's easier to go darker than to lighten it back up. I learned this the hard way when my first batch turned out looking more like a bruise than a rainbow, but now I approach it with patience and a light hand.
Why Pan Size and Cake Thickness Matter
Using standard 8-inch pans gives you layers that aren't too thick or too thin—thick enough to stand up to stacking but thin enough to bake evenly in 15-18 minutes. If your pans are slightly different sizes, your layers won't stack neatly, so consistency here really counts. I once grabbed an old 9-inch pan thinking it wouldn't matter, and one layer baked way faster than the others, teaching me the value of matching equipment.
The Frosting and Filling Strategy
Think of your frosting as both adhesive and insulation—it's what holds everything together and helps protect the candies in the center from getting lost or crushed. The thin layers between stacked cakes keep them stable, while the generous outside coating gives you room to decorate however you want. When you're assembling, take a breath and work slowly; rushed frosting application looks obvious, but patient, thoughtful frosting makes the whole cake shine.
- Chill your assembled cake before decorating if your kitchen is warm; frosting works better on a cold canvas.
- Save a bit of plain frosting before coloring it, so you have options for decorating no matter what colors you choose.
- Use an offset spatula for smooth frosting application, and don't be afraid to get a little frosting on yourself—it comes with the territory.
 Pin It
 This cake is pure celebration in sliced form, and the joy it brings when people discover those hidden candies makes it worth every colorful moment. Make it for someone you love, and you'll understand why piñata cakes feel like edible magic.
Recipe FAQs
- → How do I achieve the bright layered colors?
Use gel food coloring to tint each portion of batter before baking. Gel colors provide vivid hues without changing batter consistency.
- → What candies work best for the piñata center?
Small, non-sticky candies like mini M&Ms, rainbow sprinkles, and gummy bears work well. Avoid larger or sticky candies for easy slicing.
- → Can I make this cake gluten-free?
Yes, substitute all-purpose flour with a 1:1 gluten-free flour blend without altering other ingredients.
- → How do I prevent the layers from drying out?
Bake layers until a toothpick comes out clean and cool them on wire racks. Moisture is retained by proper mixing and baking times.
- → What’s the best way to frost and decorate the cake?
Use a creamy vanilla buttercream for frosting and decorate with colored frosting or sprinkles to complement the vibrant layers.